Some of the manoeuvres performed in this simulation must never be performed on a real patient.
The learning objectives of the session are:
| • | To recognise the signs of oxygenator gas supply failure. |
We will be simulating the use of a system in a patient with severe left ventricular failure – which is associated with significant respiratory impairment.
Scenario:
You are called urgently to see a 24 year-old man in the Emergency Department of your hospital. The patient had been brought in by ambulance complaining of chest pain and dyspnoea. You arrive in the department just after the patient has been intubated by the resident. The resident tells you that the patient deteriorated shortly after having a portable chest x-ray. He performed the intubation because the patient became profoundly hypotensive, unresponsive to commands and started to have frequent ventricular ectopy.
History:
According to the family, the young man had suffered a flu-like illness some weeks before and had been complaining of increasing shortness of breath and lethargy ever since. His family practitioner had prescribed two courses of broad-spectrum antibiotics and some bronchodilator therapy.
Initial Examination:
The endotracheal tube appears to be correctly positioned and breath sounds are symmetrical. The patient is hypotensive, tachycardic and has an irregular pulse. He is afebrile. His ventilation is being assisted using 100% oxygen and an Ambu © bag. Pulse oximetry indicates a saturation of ~80%.
Previous Medical History:
The family tells you that the patient has previously been in good health, that he takes no regular medications, and that he has no drug allergies. He has no relevant previous medical history.
Subsequent Management:
The patient is transferred to the Intensive Care Unit, further investigations are performed, a tentative diagnosis of viral myocarditis is made, and the decision is taken to support the patient with VA ECMO. The results of some of these investigations (Echo, ECG, CXR, and ABG) can be seen by clicking <Investigations> on the main menu.
We’ll assume that you have already worked your way through VA ECMO tutorials (1) and (2), so quite quickly we’ll:
Set up our monitoring:
| • | Click the <Display> button in the <Patient Monitor> window. |
| • | Check <ECG>, <Direct Arterial Pressure>, <Central Venous Pressure> and <SaO2> and |
| • | Click the <Display> button again to close this window and display the physiological signals. |
Ventilate the patient:
| • | Click the <Devices><Ventilator> menu item in the <Inspector> window. |
| • | Click the power switch at the top right-hand side of the device, and then set the tidal volume (Vt) to 500 mls, the rate to 12 bpm, the FiO2 to 100% and the PEEP to 5 cms H2O. |
Paralyse the patient:
| • | Click <Bolus Drug><Pancuronium (2mg/ml)>in the <Therapeutic Interface> window. |
| • | Drag the green slider until it says ~ 8 mgs and click the <Give> button. |
And perform a baseline blood gas analysis:
| • | Click <Investigations><Arterial Blood Gas Analysis>in the <Inspector> window. |
You elect to cannulate the patient percutaneously via the right femoral artery and vein using the Seldinger technique and ultrasonic guidance.
Imagine now that you have:
| • | Placed the Seldinger wires in the artery and vein, |
| • | Given the patient 7500 units of heparin (<Therapeutic Interface> <Bolus Drug> <Heparin> <Give> 7500 units) and |
| • | Positioned the cannulae under ultrasonic control. |
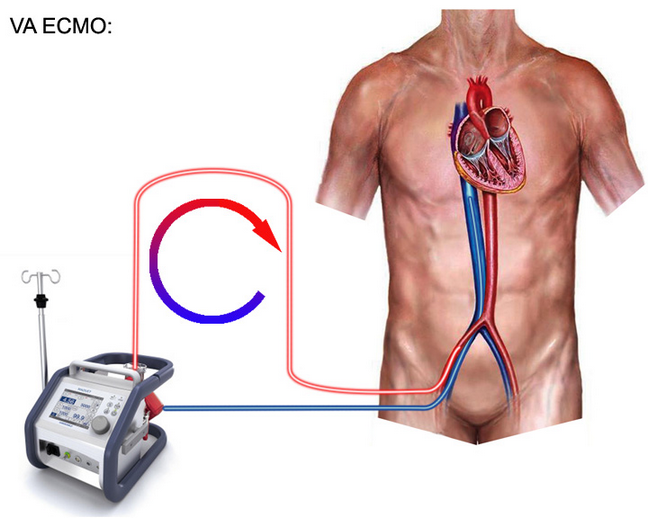
The cannulae have been connected to the ECMO system. The entire system is heparin-coated. The system’s centrifugal pump is responsible both for generating the negative pressure which is required to facilitate drainage and the positive pressure which is required to pump blood through the artificial lung and back into the patient. The pump head and oxygenator are integrated into a single, disposable unit which is mounted on the system console (Figure 1.).
Figure 1.
We’re now nearly ready to commence VA ECMO. To complete our preparations we need to:
| • | Click <Devices><ECMO System> and select the <VA ECMO> option at the bottom right of the interface. |
| • | Click the <Adjust Cannula> button and advance the drainage cannula as far as it will go using the slide control on the left hand side of the window. |
| • | Re-open the ECMO interface by clicking <Devices><ECMO System>. |
| • | Click the <Main Power> button at the top right of the interface. |
| • | Turn on 6 LPM of oxygen using the middle knob at the left of the interface. |
To initiate VA ECMO:
| • | Turn up the <RPM> until the stagnation pressure is ~ 10 mm Hg > the patient’s mean arterial pressure. |
| • | Fully open the <arterial clamp> by sliding the slider upwards. |
| • | Now slowly further increase the <RPM> until the maximum flow rate of ~ 5 lpm is achieved. |
| • | Start the <Timer> (on the physiological monitor). |
Because the mean arterial pressure is high, commence an infusion of SNP by:
| • | Selecting <Therapeutic Interface> <Infusion Drug> <SNP (100mcg/ml)> |
And starting it at 20 ml/hr:
| • | Slide green slider to <20> and click <Set> |
After five minutes:
| • | Perform an Arterial Blood Gas Analysis, |
| • | Perform an Oxygenator Blood Gas Analysis and |
| • | Return to the <ECMO System>. |
As there is no ventricular ejection, there is little difference between the arterial and oxygenator samples. In both cases, the PO2 should be about 425 mm Hg and the PCO2 about 40 mm Hg.
Now, ask the Supervisor to disconnect the gas supply to the oxygenator and
| • | Re-start the timer. |
After five minutes note that:
| • | There is evidence of increased sympathetic tone; |
| • | Ventricular ejection may be just apparent; |
| • | There is frequent ventricular ectopy and |
| • | The mixed venous saturation has fallen quite markedly. |
Now, repeat the <Arterial> and <Oxygenator Blood Gas Analysis>.
Note that the:
| • | Patient is profoundly hypoxic, |
| • | PaO2 is very low and that |
| • | PCO2 is markedly elevated (‘Hypercarbia’). |
| • | Oxygenator pre-membrane pressure is unchanged. |
| • | Oxygenator blood flow is unchanged. |
These are the hallmarks of disconnection of the gas supply to an oxygenator.
In real life, how should we respond to suspected disconnection of the gas supply to an oxygenator?
Our response can be divided into four separate stages.
| • | Checking the integrity of the oxygen supply chain. |
| • | Performing a ‘Bobbin Drop’ test. |
| • | Performing an exhaust gas analysis. |
| • | Performing an <Oxygenator Blood Gas Analysis>. |
To check the integrity of the oxygen supply chain, the gas supply should be systematically checked from the wall to the oxygenator.
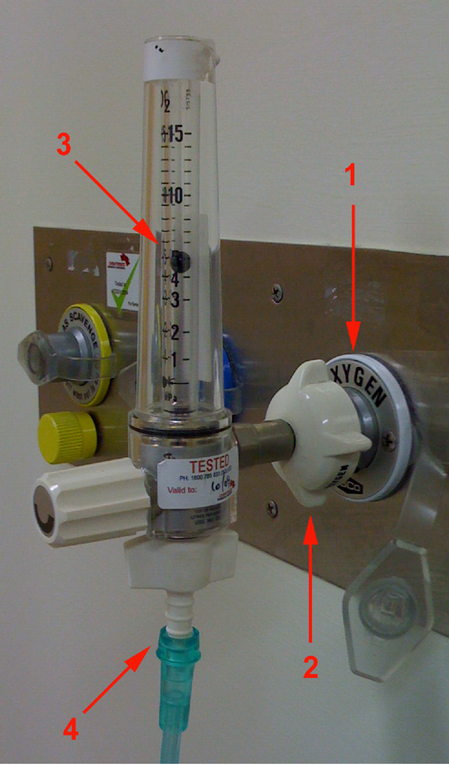
At the wall (Figure 2.), confirm that:
| 1. | The gas supply is oxygen. |
| 2. | The rotameter is securely connected. |
| 3. | The gas is flowing. |
| 4. | The supply line is connected. |
Figure 2.
If the system includes a blender, confirm that it is set to deliver 100% oxygen (Figure 3.).
Figure 3.

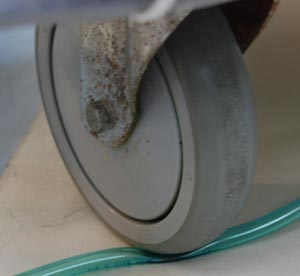
Next, make sure that there is no obstruction anywhere along the course of the supply line (Figure 4.).
Figure 4.
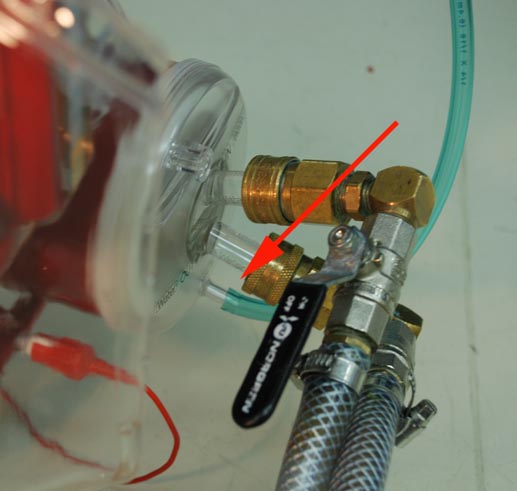
And, finally, confirm that the supply line is connected to the oxygenator (Figure 5.).
Figure 5.
If the oxygenator supply chain appears intact, you should now perform a ‘Bobbin Drop’ test.
To perform this test, transiently clamp the oxygen supply line at the oxygenator whilst observing the bobbin. During clamping, the bobbin should transiently fall. If the bobbin does not fall, it suggests that there is a leak somewhere in the supply chain and this check should be repeated.
If the supply chain check and the ‘Bobbin Drop’ tests fail to reveal any form of disconnection, exhaust gas analysis should be performed.
To do this, place the tip of a side-stream gas analyser catheter into the exhaust port of the oxygenator. If pure oxygen is being supplied to the oxygenator, the effluent gas should contain about 95% oxygen and 5% carbon dioxide. The absence of carbon dioxide implies that the gas supply to the oxygenator has been disconnected.
Finally, repeat the oxygenator blood gas analysis. If hypoxia and hypercarbia persist, urgently consider the possibility of oxygenator failure. We will deal with this in the next tutorial.
However, before we conclude this exercise, we’ll use the simulator to explore the effect of inadvertently administering air (rather than 100% oxygen).
To do this:
| • | Ask the Supervisor to re-connect the gas supply to the oxygenator. |
| • | Reduce the <inspired oxygen concentration> on the ECMO system to 21%. |
| • | Leave the other ECMO controls unchanged. |
| • | Re-start the <timer>. |
After five minutes,
| • | Repeat the <Oxygenator Blood Gas Analysis>. |
Note that the effluent blood from the oxygenator is relatively hypoxic (PaO2 ~ 75 mm Hg), but hypo- rather than hyper-carbic (PCO2 ~ 34 mm Hg). This picture (relative hypoxia in association with normo- or hypo-carbia) is characteristic of an oxygenator which is being supplied with air rather than oxygen.